Crocheting is an art that combines creativity and skill, producing beautiful and functional items.
However, to achieve that polished, professional finish, blocking your crochet projects is a must.
Whether you’re a beginner or a seasoned crocheter, understanding the importance of blocking, how to do it, and when you can skip it, will elevate your crochet game. Blocking is crucial for achieving the correct sizing and shaping in crochet patterns.
Let’s dive into the world of blocking and discover how it can transform your crochet creations.
What is Blocking in Crochet?
Blocking is the process of shaping and setting your crochet or knit fabric pieces to ensure they are the correct size, shape, and smoothness.
This involves dampening the fabric and pinning it into the desired dimensions, allowing it to dry in place. Blocking helps shape the project, even out tension, enhance stitch definition, open up lace patterns, and give your projects a professional finish.
Why Blocking Matters
- Enhances Appearance: Blocking smooths out the bumps and curls that occur during crocheting, giving your project a neat and even look.
- Refines Shape: Ensures your project maintains its intended shape and dimensions.
- Opens Up Lace Patterns: Particularly important for lace projects, blocking reveals the intricate designs.
- Improves Drape: Makes garments and accessories hang better, enhancing their overall look and feel.
- Professional Finish: Adds a polished, professional touch to your handmade items.
Understanding why block crochet is essential can help you achieve these benefits. Blocking improves the overall appearance and ensures the project maintains its intended shape, with natural fibers responding better than synthetics.
Materials Used for Blocking
Blocking requires a few essential materials to achieve the best results. Here are some of the most common materials used for blocking:
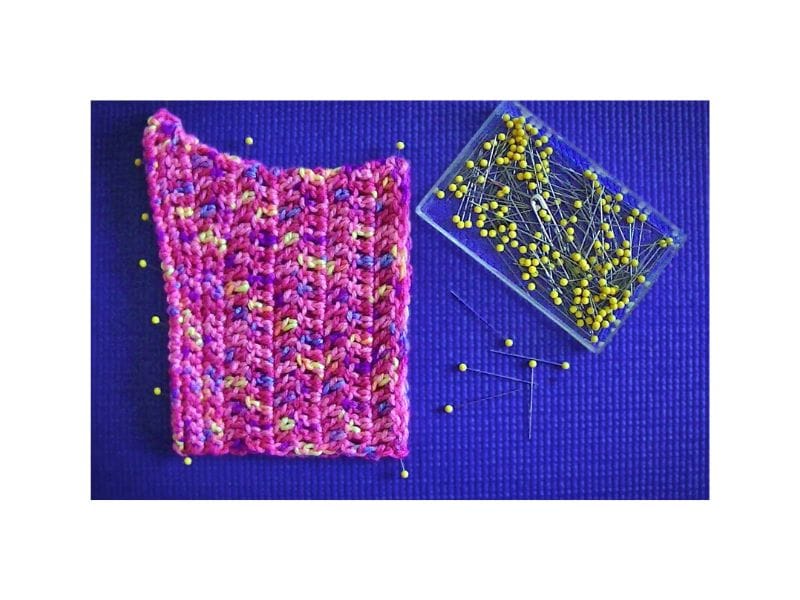
- Blocking Board or Mat: A flat surface to pin the project onto, made of materials such as foam, wood, or plastic. A blocking board or mat provides a stable and pinnable surface, ensuring your crochet project maintains its shape as it dries.
- Pins: Rust-proof or stainless-steel pins are recommended to avoid leaving orange marks on the project. These pins hold your project in place without damaging the fibers.
- Spray Bottle or Steamer: Used to add moisture to the project, either by spraying water or using steam. This helps to relax the fibers and set the stitches in place.
- Measuring Tape or Ruler: To measure the project and ensure it is blocked to the correct size. Accurate measurements are crucial for achieving the desired dimensions.
- Blocking Wires: Used to block intricate lace projects or to add extra support to the project. Blocking wires help maintain straight edges and even tension across the fabric.
- Starch or Wrinkle Releasers: Optional products used to add extra stiffness or to help relax fibers. These can be particularly useful for projects that need a bit more structure.
Types of Blocking
There are several types of blocking methods, each with its own advantages and disadvantages. Here are some of the most common types of blocking:
- Wet Blocking: Involves completely wetting the project to block it, either by soaking or spraying. Wet blocking is ideal for natural fibers like wool and cotton, as it allows the fibers to relax and set into the desired shape.
- Steam Blocking: Uses steam to block the project, either with a steamer or the steam function on an iron. Steam blocking is effective for both natural and synthetic fibers but be cautious with acrylic yarn to avoid melting.
- Finger Blocking: A temporary fix that involves using fingers to pull and stretch the fabric into the desired shape. This method is quick but not as durable as other blocking techniques.
- Spray Blocking: A quick and easy method that involves misting the project with water using a spray bottle. Spray blocking is suitable for small projects or when you need a light touch-up.
Preparing Your Crochet Project for Blocking
Before blocking your crochet project, it’s essential to prepare it properly. Here are some steps to follow:
- Weave in Ends: Use a yarn needle to weave in any loose ends to prevent them from coming loose during the blocking process. This ensures a neat and tidy finish.
- Check for Mistakes: Inspect the project for any mistakes or errors that need to be corrected before blocking. Fixing these issues beforehand will save you time and effort.
- Measure the Project: Measure the project to ensure it is the correct size and to determine the best blocking method. Accurate measurements help you achieve the desired dimensions.
- Choose the Right Blocking Method: Select the most suitable blocking method for the project, taking into account the type of yarn, stitch pattern, and desired finish. Different projects may require different blocking techniques for the best results.
How to Block Crochet Projects
Here's a reminder on the types of blocking:
- Wet Blocking: Soaking the item in water, then shaping and pinning it to dry.
- Steam Blocking: Using steam from an iron to shape and set the fabric.
- Spray Blocking: Spraying the item with water, then shaping and pinning it to dry.
Step-by-Step Guide to Wet Blocking
Wet blocking is a popular and highly effective method for setting your crochet projects.
Follow these general steps to achieve the best results with wet blocking:
- Soaking: Submerge your crochet item in lukewarm water and let it soak for 15-30 minutes.
- Remove Excess Water: Gently squeeze out excess water without twisting or wringing which can damage the yarn. Roll the item in a towel to remove more moisture.
- Shape and Pin: Lay the item on dry towel, a blocking board, or a clean, flat surface. Shape it to the desired dimensions and pin it in place using rust-proof pins. It will dry in the pinned shape.
- Drying: Allow the item to dry completely, which may take up to 24 hours.
As an alternative, you can also steam block your crochet projects. Steam blocking is effective for light shaping and is less likely to damage fibers compared to wet blocking. It involves using steam from a garment steamer or iron and can be quicker and easier for certain items.

Beginners' Guide to Blocking
- Start Small: Begin by blocking small items like swatches or granny squares to get the hang of it.
- Use the Right Tools: Invest in rust-proof pins, blocking boards, and a spray bottle. Blocking boards provide a stable surface and often come with grid patterns for precision, making it easier to shape and size your projects accurately. There are various types, including DIY options and specialized peg blocking boards, which can block multiple squares simultaneously.
- Be Gentle: Handle your crochet pieces with care to avoid stretching or damaging the fibers.
Special Considerations for Blocking
There are some special considerations to keep in mind when blocking certain types of crochet projects. Here are a few:
- Acrylic Yarn: Acrylic yarn can be challenging to block, but steam blocking can be effective. Be careful not to overheat the yarn, as it can partially melt and become misshapen. Blocking acrylic yarn requires a gentle touch.
- Natural Fibers: Natural fibers such as wool, cotton, and bamboo respond well to blocking and can be blocked using either wet or steam blocking methods. These fibers relax and set beautifully when blocked.
- Lace Projects: Lace projects require extra care when blocking, as they can be delicate and prone to distortion. Use blocking wires or a lace blocking mat to help maintain the intricate stitch pattern. This ensures the lace opens up and displays its full beauty.
- Garments: Garments such as sweaters and cardigans require blocking to achieve a professional finish. Use a blocking board or mat to help shape the garment and ensure it lies flat. Proper blocking enhances the fit and drape of the garment.
Troubleshooting Common Blocking Issues
Here are some common blocking issues and how to troubleshoot them:
- Uneven Edges: Check that the project is pinned evenly and that the edges are aligned properly. Use blocking wires or a lace blocking mat to help maintain the stitch pattern. This ensures a uniform finish and straight edges.
- Distortion: Check that the project is not being stretched or pulled too tightly, as this can cause distortion. Use a blocking board or mat to help maintain the shape of the project. Gentle handling is key to preserving the integrity of the stitches.
- Over-blocking: Check that the project is not being blocked too aggressively, as this can cause the fibers to become misshapen. Use a gentle blocking method and avoid over-stretching the project. Less is often more when it comes to blocking.
- Under-blocking: Check that the project is being blocked enough, as under-blocking can result in a project that is not lying flat. Use a blocking board or mat to help shape the project and ensure it lies flat. Proper blocking ensures a polished finish.
When You Can Skip Blocking
Still debating whether you need to block your crochet projects?
Here’s the truth: Not always.
Blocking can be optional when working with yarns made of polyester or acrylic that are inherently soft. If your stitches are already even and you’re happy with the appearance of your fabric, you can skip the blocking process. However, when you block acrylic yarn, it can be challenging to achieve strong results compared to natural fibers like cotton. Steam blocking can still improve the yarn's tension and drape, but be aware that acrylic yarn may not retain its shape after washing.
- Projects Not Requiring Precision: Items like dishcloths or simple scarves may not need blocking.
- Non-Delicate Fibers: Some synthetic fibers may not benefit significantly from blocking.
- Quick Projects: If you’re short on time and the item looks good enough, you might skip blocking.
Types of Projects That Benefit from Blocking
While any crochet project can benefit from a good block, it has the most significant impact on items made with natural fibers like wool and cotton, or these:
- Lace: Enhances the openwork and detail.
- Socks: Ensures they fit well and look neat. You can even get a sock blocker!
- Garments: Improves fit and drape.
- Gauge Swatches: Essential for accurate measurements and fitting.
Tips for Successful Blocking
Blocking crochet doesn't need to be complicated.
Here are some universal tips for any method you choose:
- Check Your Yarn Label: Different fibers require specific treatments, so your first step should be to examine the yarn label for fiber content and care instructions.
- Use Those Rust-Proof Pins: To avoid staining your project. It would be sad if your rust your newly created masterpiece.
- Invest in a Blocking Board: Provides a flat, pinnable surface.
- Invest in Crochet Blockers: These are handy tools, with multiple pins (Set of 20 combs, set of 25 combs), used to shape and set crochet projects by holding them in place during the blocking process, ensuring they dry to the desired dimensions.
- Smooth Out and Stretch Evenly: Ensure you stretch the stitches uniformly across the entire project, not just at the edges. This will distribute tension evenly and prevent distortion as your project dries.
- Be Patient: Allow sufficient drying time for the best results.
- Check Fiber Content: Some fibers react differently to blocking methods.
Blocking Without a Board, Mat, or Pins
If you don't have a blocking board or pins, you can still block your crochet projects by using these:
- Flat Surface: Use a clean, flat surface like a bed or carpet.
- Heavy Books: Place heavy books on the edges to hold the shape. Not practical, but it works.
- Towels: Lay your project on a towel and roll it to shape.

How to Block Granny Squares, Blankets, and Large Projects
You will use the same techniques for blocking your Granny Squares, Blankets, and Large Projects.
- Granny Squares: Block each square individually before joining them together.
- Blankets: Use a large, flat surface like a bed. Pin or weigh down the edges evenly.
- Large Projects: Divide into sections and block each section separately for manageability.
Necessary Tools for Blocking
Though for some people the following supplies are optional, it's best to fill your arsenal with the correct tools for the job - such as:
- Blocking Board: Provides a pinnable surface.
- Rust-Proof Pins: Essential for holding your project in place.
- Spray Bottle: For spray blocking.
- Towels: For soaking up excess water.
- Iron: For steam blocking (with caution).
Wrapping Up
By following these guidelines and troubleshooting tips, you can block your crochet projects like a pro, ensuring they look their best and last longer.
Happy crocheting!


Images Courtesy of Repeat Craft Terme and Canva

