Needle felting is a captivating craft that transforms wool fibers into intricate shapes and designs using specialized needles.
Whether you're a seasoned needle felter or just starting your first project, understanding the best needles for needle felting is crucial for achieving the desired results.
This guide to felting needles will walk you through the various types of felting needles, their uses, and how to choose the right one for your project.
Key Takeaways:
- Different types of felting needles serve various purposes in the felting process, from shaping to detailing.
- The gauge number and shape of the felting needle significantly impact the felting outcome.
- Quality needles, such as those made from high carbon steel, ensure durability and efficiency.
The Basics of Felting Needles
Felting needles are not your ordinary sewing needles.
They are designed with barbs along the shaft that catch and tangle the wool fibers, creating a dense, felted material.
The finer the felting needles, the more detailed work you can achieve. Conversely, a thicker felting needle is better for initial shaping and joining pieces.

Types of Felting Needles
There are several types of felting needles, each with unique characteristics.
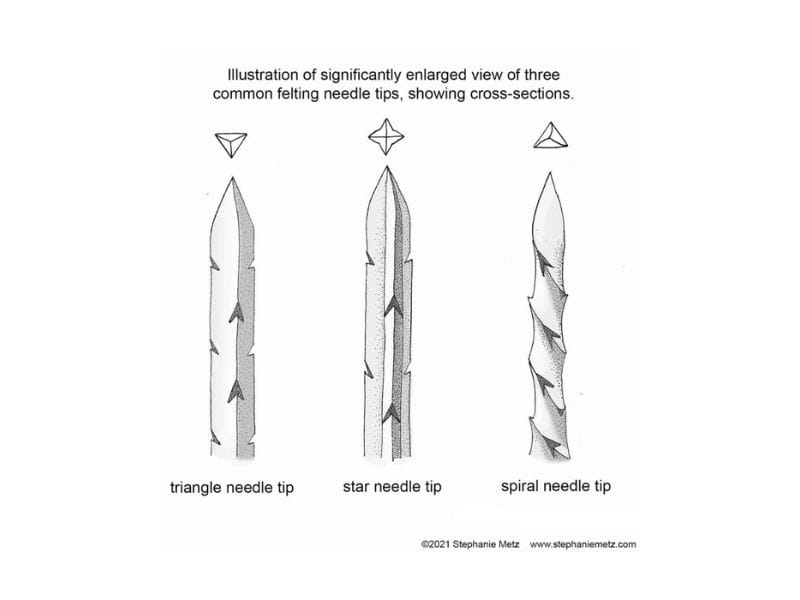
The most common types include triangular felting needles, star felting needles, and spiral felting needles.
Triangular felting needles are versatile and great for general felting.
Star felting needles have more barbs, making them ideal for faster felting.
A spiral felting needle, with its twisted design, is perfect for adding fine details and achieving a smooth finish.
Gauge Numbers and Their Importance
The gauge number of a felting needle indicates its thickness.
The higher the number, the finer the needle. For example, a 40-gauge felting needle is finer than a 36-gauge needle.
Finer needles are excellent for detailed work and finishing touches, while thicker needles are better for the initial stages of felting.
Triangular Felting Needles
Triangular felting needles are the workhorses of the felting world.
They have three sides with barbs that efficiently tangle the wool fibers. These needles come in various gauges, making them suitable for different stages of the felting process.
Uses of Triangular Needles
- A triangular needle is perfect for general felting tasks, such as shaping and joining pieces.
- They are also great for creating a firm base layer before moving on to finer details.
- If you're working with coarser wool, a thicker triangular felting needle will help you achieve a dense, sturdy structure.
Choosing the Right Gauge
- When selecting a triangular needle, consider the gauge number.
- A 36-gauge needle is ideal for initial shaping.
- While a 38-gauge needle is better for refining the shape.
- For adding fine details, a 40-gauge needle is your best bet.
Having a range of gauges in your needle felting kits will give you the flexibility to tackle any project.
Star Felting Needles
Star felting needles are designed for speed.
With four sides and more barbs, they can felt wool fibers more quickly than triangular needles. This makes them an excellent choice for larger projects or when you need to cover a lot of surface area.
Speed and Efficiency
- The additional barbs on star needles mean they can catch and tangle more fibers with each poke. This results in faster felting, which is particularly useful when working on large pieces or when you need to build up layers quickly.
However, the increased speed comes with a trade-off in precision, so star needles are best used for the initial stages of felting.
Ideal Projects for Star Needles
- Star needles are perfect for creating the core shapes of your project.
- For example, if you're making a felted animal, you can use a star needle to quickly form the body and limbs.
Once the basic shape is in place, you can switch to finer felting needles for detailing and finishing.
Spiral Felting Needles
Spiral felting needles are a favorite among experienced needle felters.
Their twisted design allows for smoother felting and finer details. These needles are excellent for adding intricate patterns and achieving a polished finish.
Benefits of Spiral Needles
- The spiral design of these needles helps them glide through the wool fibers more smoothly, reducing the risk of breaking.
- This makes them ideal for working with finer wools, such as merino wool.
- Additionally, the twisted shape allows for more even felting, resulting in a smoother surface.
When to Use Spiral Needles
Spiral needles are best used for the final stages of your project.
- Once you've shaped and firmed up your piece with triangular or star needles, you can switch to a spiral needle to add fine details and achieve a smooth finish.
- They are also great for creating delicate features, such as facial details on felted animals.
Reverse Felting Needles
Reverse felting needles are unique in that they pull fibers out of the felted piece rather than pushing them in.
This creates a fluffy finish, which can be useful for adding texture and volume to your project.
Creating Texture with Reverse Felting Needles
By working in the opposite direction, reverse felting needles are perfect for creating a fluffy, textured surface.
- For example, if you're making a felted animal, you can use a reverse needle to create a furry appearance.
- This technique is also useful for adding volume to specific areas, such as the mane of a felted lion.
Combining a Reverse Felting Needle with Other Tools
While reverse needles are great for adding texture, they should be used in conjunction with other felting tools.
- Start by shaping your piece with triangular or star needles, then use a reverse needle to add the desired texture.
This combination will give you the best of both worlds: a firm structure with a fluffy finish.
Needle Felting Kits
Needle felting kits are a great way to get started with this craft.
They typically include a variety of felting needles, wool fibers, and other tools needed for your first project. These kits are designed to provide everything you need to dive into needle felting without having to source individual components.
What to Look for in a Kit
When choosing a needle felting kit, look for one that includes a range of needle types and gauges. This will give you the flexibility to tackle different stages of the felting process.
Additionally, high-quality fine wool fibers, such as merino wool, will make your felting experience more enjoyable and yield better results.
Benefits of Using a Kit
Using a needle felting kit can save you time and effort, especially if you're new to the craft.
The included instructions and materials are curated to help you succeed in your first project.
As you gain experience, you can start experimenting with different needles and wool types to expand your skills.
Note: It could depend on the kit, but in my experience in using beginner kits, a finer needle is not included.
Quality Needles and Materials
The quality of your felting needles and materials can significantly impact your felting experience and the final outcome of your project.
Investing in high-quality felting needles and wool fibers will make the process smoother and more enjoyable.
High Carbon Steel Needles
Quality needles are typically made from high carbon steel, which ensures durability and sharpness.
These needles are less likely to break and will maintain their barbs longer, making them a worthwhile investment for serious needle felters.
Choosing the Right Wool
The type of wool you use is just as important as the needles.
Merino wool is a popular choice due to its fine texture and ease of felting.
However, different projects may require different types of wool.
- Coarser wools are better for creating a firm base,
- while finer wools are ideal for adding detail and achieving a smooth finish.
Avoiding Needle Breakage
One of the most common issues needle felters face is needle breakage. Understanding how to avoid breaking your needles will save you time and frustration.
Proper Technique
Using the correct technique is crucial for preventing needle breakage.
- Always insert and remove the needle at the same angle to avoid bending it.
- Additionally, avoid using excessive force, as this can cause the needle to snap.
Choosing the Right Felting Needle
Selecting the appropriate needle for your project can also help prevent breakage.
- Thicker needles are more durable and better suited for initial shaping,
- while a finer needle should be reserved for detailing.
Using the right needle for each stage of the felting process will reduce the risk of breakage.
Adding Detail with Fine Felting Needles
A finer needle is essential for adding intricate details to your felted pieces. These needles have a higher gauge number and are designed for precision work.
Techniques for Fine Detailing
When adding fine details, use a light touch and work slowly.
- Fine needles are delicate and can break easily if used with too much force.
- Focus on small areas at a time and gradually build up the detail.
Examples of Fine Detailing
Fine needles are perfect for creating facial features, such as eyes and noses, on felted animals.
They are also great for adding patterns and textures to your pieces.
- For example, you can use a fine needle to create the appearance of fur or scales on your felted creations.
Joining Pieces Together
Joining pieces of felted wool together is a common task in needle felting.
Whether you're attaching limbs to a body or adding details to a base, using the right technique and needle is crucial for a seamless join.
Techniques for Joining Pieces
To join pieces together:
- Use a thicker needle to initially tack the pieces in place.
- Once they are secure, switch to a finer needle to blend the fibers and create a smooth join.
This technique ensures a strong connection without visible seams.
Common Challenges
One common challenge when joining pieces is achieving a seamless look.
- To overcome this, use small, consistent pokes and work slowly.
- Additionally, blending the fibers from both pieces will help create a more natural transition.

Needle Felting Tools
In addition to needles, several other tools can enhance your needle felting experience. These tools can help you achieve more precise results and make the process more efficient.
Felting Mats and Pads
A felting mat or pad provides a stable surface to work on and protects your needles from breaking. These mats come in various materials, such as foam or wool, and can be used for different stages of the felting process.
Needle Holders
Needle holders are designed to hold multiple needles at once, allowing you to cover more surface area quickly. These tools are particularly useful for larger projects or when you need to build up layers of wool.
Personal Preference in Needle Felting
Every needle felter has their own preferences when it comes to tools and techniques.
Experimenting with different felting needles and materials will help you find what works best for you.
Finding Your Style
As you gain experience, you'll develop your own style and preferences.
Some needle felters prefer using a star felting needle for speed, while others favor spiral needles for a smooth finish.
Don't be afraid to try different tools and techniques to discover what you enjoy most.
Learning from Others
Joining a needle felting community or taking a workshop can provide valuable insights and inspiration. Learning from other needle felters can help you improve your skills and discover new techniques.
Felting Needle Gauges Re-Cap
Felting needles come in various gauges (unlike the gauge numbers for knitting needles) which refers to the thickness of each needle. The gauge number is inversely related to the needle thickness.
The higher the gauge number, the finer the needle.
Felting needle gauges include: 32, 36, 38, 40 and 42, with the 32 and the 42-size felting needle being the least common.
Some felting needles come color coded. If you find felting needles that are not color coded, you can color code them using different colors of nail polish, rubber bands, or polymer clay.
Until you become familiar with the size, type and feel of the different needles, color coding is a helpful way to remember which type and size felting needle you prefer to work with when the times comes to order more needles.
For beginners, keeping this guide to felting needles handy will serve as a good point of reference to assist you in choosing the correct needle from start to the finished project.
Note: when I started needle felting, I used a single needle (not a multi felting tool) in 38 gauge. To achieve a smooth surface, I rubbed the needle holes with my fingers or massaged the structure by rubbing it between the palms of my hands. Today, I still use 38-gauge needles but I also use a multi needle tool.
Wrapping Up
Understanding the best felting needle for felting is essential for achieving the desired results.
From triangular and star needles to spiral and reverse needles, each type has its unique benefits and uses.
By selecting the right felting needle and using proper techniques, you can create beautiful, intricate felted pieces.
Investing in quality needles and materials, such as high carbon steel needles and merino wool, will enhance your felting experience and ensure durability.
Whether you're a beginner or an experienced needle felter, experimenting with different tools and techniques will help you find your personal style and improve your skills.

What is the best needle for beginners in needle felting?
For beginners, a 36-gauge triangular felting needle is a great starting point. It is versatile and durable, making it suitable for shaping and joining pieces. As you gain experience, you can experiment with finer needles for detailing.
How do I prevent my felting needles from breaking?
To prevent needle breakage, always insert and remove the needle at the same angle. Avoid using excessive force and choose the appropriate needle for each stage of the felting process. Using a felting mat or pad can also help protect your needles.
Can I use sewing needles for needle felting?
Sewing needles are not suitable for needle felting. Felting needles have barbs along the shaft that catch and tangle the wool fibers, which is essential for felting. Using sewing needles will not achieve the same results and can damage your project.


Images Source: Canva and Stephanie Metz

